
 5 mins read
Serverless architecture:
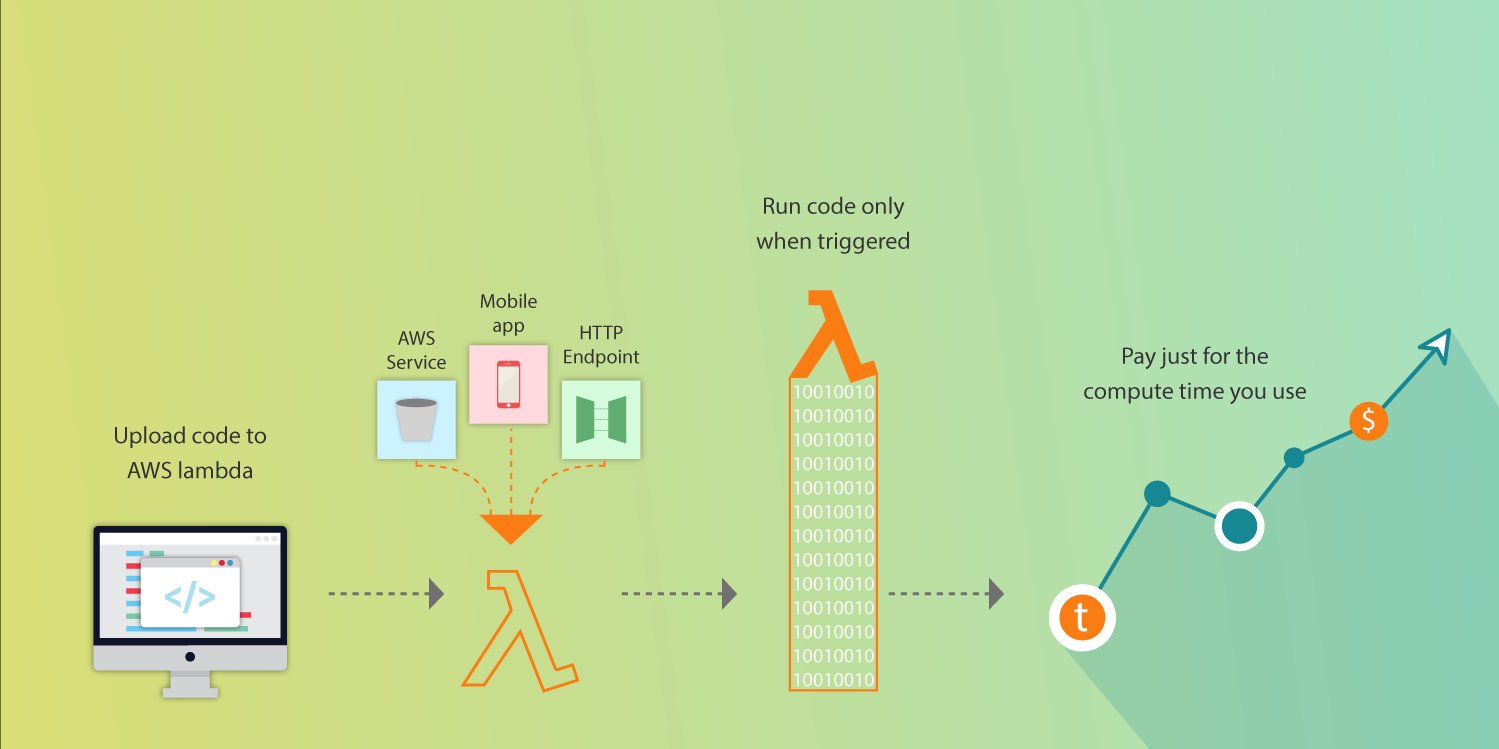
In serverless architecture, the server will not run all the time. Server will be active only when any request will be there for processing and in remaining time server will in sleep mode. Unlike server architecture, monthly subscription plan need not to be taken as user has to pay that much amount for the active time of server which helps to reduce server cost.
Microservice:
Microservice architecture is a method of developing system in a small modules which communicates internally with other modules through lightweight mechanism like HTTP/REST with JSON.
Advantages of using Microservice Architecture:
• Each module of application can be developed, tweaked and redeployed independently
• In Microservice architecture, different modules of the application can be built with different technologies.
• In Microservice architecture, each modules usually mange its unique databases so decentralized data management can be easily done.
Reason for using Microservice Architecture:
• In monolith applications, server-side handles all the HTTP request of applications which executes logic and do CRUD operation on database so if one component need to scale whole application need to scale this comes the reason to use Microservice architecture.
Below are steps for creating AWS account and AWS Lambda function with REST API in AWS cloud with minimal code.
Steps for Creating AWS Account:
Step 1.
Go to https://aws.amazon.com/ and click on Create a Free Account.

Step 2.
Now you have to enter your email address and select “I am a new user.” option and then click on Sign in using our secure server.

Step 3.
After that, you need to enter your Full Name, retype your email address and set password for your account and then click on Create Account.
 Step 4.
In Contact Information tab, select Personal Account and fill your personal details and click on Create Account and Continue.

Step 5.
Now you have to enter your bank details for payment and click on Verify Card and Continue.
 Step 6.
In Identity Verification tab, you need to verify your mobile number by entering Captcha and your mobile number with extension. Once your number is verified click on Continue to select your Support Plan.

Step 7.
Select your plan according to your need and click on Continue.

This will create your AWS account. For Sign-In click on Sign-In console and enter your email address, select “I am a returning user and my password is:” and enter your password after that click on Sign in using our secure server.

Steps for Creating AWS Lambda Function:
Step 1.
After Sign in, go in Services tab and search for Lambda and then select Lambda.
 Step 2.
Click on Get started Now.
 Step 3.
In Select blueprint page, select runtime from dropdown and select your blueprint accordingly. Now I am selecting Node.js 6.10 and Blank Function as my blueprint.
 Step 4.
After that, you need to select how you will call Lambda function by clicking on blank square box or you can skip this by clicking on next. I am skipping this step by clicking on next.
 Step 5.
In configure function tab, you have to enter function name, description and environment in which you want to run and can change function code in Lamda function code tab. I have created Lambda function which will reverse a string and written logic for same in Lambda function code tab.

Scroll Down and set Role for the function. Select Create new Role from template(s) and enter role name.

Click on Advance Tab and here memory for function is set for 128mb and timeout for running function is set for 3s which I think is enough and then click on Next.
 Step 6.
After that review of function will come and then click on Create function.

You can test your Lamda function by clicking on Test.

You can see your function output in execution result. I have created function of reverse string of “Hello from Lambda” so you can see my result.

Steps for Creating API for Lambda Function:
Step 1.
Go in service Tab and search for API Gateway and click on API Gateway.

Step 2.
Click on Get Started.

Step 3.
Click on New API and enter API name, description and then click on Create API.

Step 4.
Here I am creating API whose request type is Get so click on Actions and then click on Create Method in which you have to select GET as method.
 Step 5.
Click on right button below Get method. Then select Lamda Region, enter your Lambda function name and then click on Save.

For creating API, you need to add permission so click on OK.

Step 6.
In Get Method Execution Screen, click on Integration Request.

You can check whether your Lambda function is selected or not.

Expand Body Mapping Templates tab and select “When there are no templates defined (recommended)” and enter Content Type as “application/json” by clicking on Add mapping template and then click on right button.
Enter your JSON object in General template which helps you to pass input in headers and then click on save button.

Now API is ready, to Deploy API click on Actions menu and then click on Deploy API.
Select New Stage for Deployment Stage and enter Stage name. You can also enter production description, deployment description and then click on Deploy.

You can call API by clicking on Invoke URL.

To use input of API in your Lambda function you can get value from event object. I am here modifying my Lambda function by going in Lambda tab and select your function name which you want to edit. Once you edited the code click on Save and Test,

Now you can API by URL followed by parameters in query string.

Originally published at Scotch.io on September 26, 2017.